
If you’ve ever opened Spotlight on your Mac and found relevant content from apps like Notes or Mail instantly appearing, you’ve already experienced the power of Spotlight extensions. These little helpers are more than just under-the-hood tools — they bridge the gap between your apps and macOS’s deep, intelligent search.
Spotlight extensions are small plug-ins provided by macOS apps, including both Apple-developed and third-party ones. Their sole purpose is to give Spotlight insight into an app’s content, structure, and metadata. This means that when you search for something — a document, a message, a note, or even a snippet of code — Spotlight knows where and how to look, retrieving results with uncanny accuracy and speed.
If you’ve ever thought, “Why is this app’s content showing up in my search?” — chances are that’s due to a Spotlight extension quietly doing its job in the background. And you’re not alone in wondering. Many users want more control over how and when their data surfaces in system-wide searches, especially when productivity meets privacy.
These extensions typically live hidden inside apps themselves, bundled within their containers — technically found in Contents/Library/Spotlight directories. You don’t have to go digging there, though. macOS provides a friendly interface that lets you enable or disable them with a simple toggle.
By choosing which extensions are active, you’re not just deciding what shows up in Spotlight — you’re customizing your Mac’s behavior to align with your workflows, your preferences, and your comfort level around privacy. Are you a creative professional who wants design files from specific apps to appear first? Or maybe you’re someone who values discretion and would prefer certain apps stay out of Spotlight altogether. Either way, managing these extensions hands you the reins.
What’s even more empowering is that disabling an app’s Spotlight extension doesn’t make its files invisible — it just tells Spotlight not to apply app-specific indexing rules. So you retain access to your files, but with less potentially private metadata being surfaced in search results.
Spotlight extensions are a small but mighty corner of macOS — built to serve you, not clutter your experience. Taking charge of them is one of the simplest ways you can create a workflow that feels more purposeful, more efficient, and a whole lot more private.
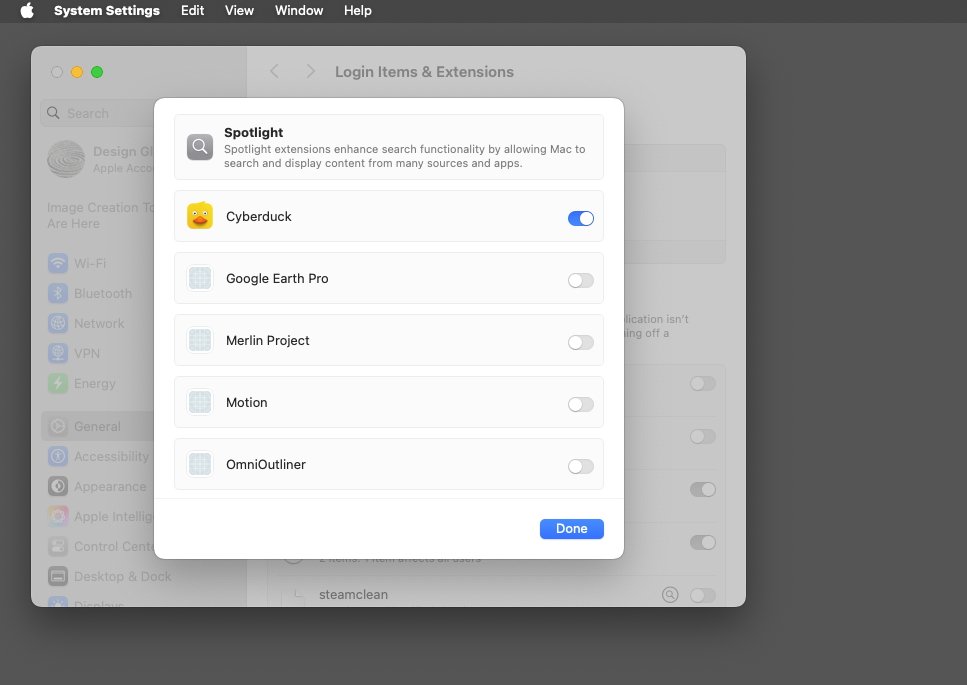
To start customizing your Spotlight experience, head to the System Settings on your Mac. Open the Apple menu in the top-left corner of your screen and select System Settings (or System Preferences on earlier versions of macOS). Once inside, click on General, then select Login Items & Extensions. From there, look for the Spotlight section. This is where everything comes together — a unified place where you can review all the Spotlight extensions that third-party apps have installed on your Mac.
You’ll notice a list of apps that currently have Spotlight extensions available. Each app is accompanied by a switch that you can toggle on or off. Feel free to explore this list without fear — turning off a Spotlight extension for an app doesn’t delete any content or disrupt the app’s functionality. You’re simply making a decision about whether Spotlight should use that specific extension to enhance its search results for you.
Maybe you installed a productivity app ages ago that you’re no longer actively using. Its data still appears in Spotlight, occasionally causing unwanted clutter. Disabling its extension is a gentle but effective way to reduce the noise without uninstalling the app. Or perhaps you’re a researcher who relies heavily on one specific notes app — by ensuring its Spotlight extension is enabled, you make sure those research bits are prioritized and easy to find when time counts.
The control is granular, intuitive, and empowering. Spotlight becomes less of a black box and more of a customizable personal assistant, responsive to your unique needs. And if anything ever feels off — say certain results aren’t showing or performance feels sluggish — you can always revisit this menu and fine-tune based on what’s working for you today.
As with all things macOS, take your time exploring. You don’t need to make all the changes at once. Start small. Toggle one extension off and see how Spotlight responds. Check to see if the results feel more relevant for you. It’s all reversible. This trial-and-error is part of shaping your Mac’s behavior to match how you work best.
And for those moments when Spotlight doesn’t seem to reflect the changes you’re making, don’t worry. Sometimes it needs a gentle nudge — like a quick reindex or Spotlight restart — but that’s nothing to shy away from. We’ll explore simple ways to do that in the next section using the Terminal or System Settings, so you always feel supported and in control.
Customizing Spotlight extensions isn’t just about reducing what you see — it’s about honoring what matters most in your workflow. Whether you’re simplifying searches for clarity or refining them for power, every toggle is a meaningful step toward a Mac that works for you.
Sometimes, even when you’ve carefully adjusted your Spotlight settings in the System Settings app, things don’t quite behave the way you expect. Maybe results still seem off, outdated files keep showing up, or a recent change isn’t reflected in search. Don’t worry — there’s a deeper level of control available through the macOS Terminal. And while the idea of using Terminal might seem intimidating, you’re not alone in feeling that way — and you absolutely don’t need to be a tech expert to use these tools confidently.
The Terminal offers a few helpful Spotlight utilities that let you manage indexing more directly: mdutil and mdfind. These are powerful tools that give you a peek under the hood of Spotlight and — with just a few simple commands — can help refresh its memory or tailor how it works behind the scenes.
Let’s walk through them together, one step at a time, so you can feel supported and in control. If you ever get stuck or feel unsure, just take a breath — you can always reverse these changes. Nothing here is permanent or dangerous when used as shown.
mdutil: Manage Indexing
mdutil is your go-to tool for toggling Spotlight’s indexing on or off for a specific disk or folder. This can be incredibly helpful if you want to temporarily stop Spotlight from indexing external drives or large folders that you don’t need popping up in your search results.
- Check indexing status:
mdutil -s /— This checks whether indexing is enabled on your main drive. Replace/with the path to another volume if needed.
- Disable indexing:
sudo mdutil -i off /
- Enable indexing:
sudo mdutil -i on /
You’ll be prompted to enter your administrator password — that’s completely normal. This small step keeps your system safe from unauthorized changes.
Want to erase and rebuild the Spotlight index from scratch? Maybe you want to fix strange behavior or ensure new Spotlight extension settings are fully applied. Here’s how:
- Erase and rebuild index:
sudo mdutil -E /
This quietly tells Spotlight to delete its current index and start fresh. It can take a little time, depending on your files, but it often resolves issues where searches feel stale or inaccurate. Think of it like hitting a quiet reset button for better results tomorrow.
mdfind: Run Manual Searches
With mdfind, you can use the same underlying search engine that Spotlight uses — but in the Terminal. It’s a surprisingly useful way to test whether certain keywords or metadata are currently being seen by Spotlight.
- Basic search:
mdfind "kind:pdf"— Finds all PDFs on your Mac. You can change “pdf” to anything you want like “note”, “image”, or a specific document name.
- Search by metadata:
mdfind "kMDItemAuthor == '*Smith*'"— Finds files where the author metadata contains “Smith”.
Why use this? If a file isn’t showing up in Spotlight but does show here, you’ll know Spotlight has indexed it — and the issue may lie in settings or extensions. Alternatively, if it doesn’t appear in mdfind either, it likely hasn’t been indexed yet or was excluded.
You’re Not Alone — and It’s Okay to Experiment
There’s no pressure to use Terminal if it feels overwhelming at first — but it’s here waiting for you when you’re ready, like a quiet toolkit tucked away behind the scenes. Each command gives you a little more power, a little more clarity, especially during those moments when the System Settings alone don’t seem to be enough.
Take small steps. Try checking the index status. If you’re feeling confident, try reindexing a folder and see if search improves. When you experience that first “aha!” moment — where Spotlight starts showing exactly what you need — you’ll know these tools helped get you there.
And most importantly, know that you’re in full control. Spotlight should work with you, not against you. With a couple of Terminal commands in your back pocket, you’re never more than a few keystrokes away from smoothing out your macOS experience.
If you’re a developer curious about how to create Spotlight extensions — or even just exploring how to help your app become more searchable — you’re not alone. Many macOS developers wonder how to make their apps more discoverable via Spotlight but often don’t know where to begin. The truth is, crafting a Spotlight extension can feel a little complex at first, but the available tools and documentation can help guide you step-by-step in building something truly helpful for your users.
Spotlight extensions are built using what Apple refers to as “metadata importers.” These are small bundles — typically using the .mdimporter suffix — that live inside your app and define how Spotlight should interpret the content your app creates. You use these importers to instruct Spotlight on what is most useful about your files: is it the title, author, date created, or something more unique like tags or internal project identifiers?
Your users deserve a search experience that highlights exactly why your app matters in their workflow — and that’s what great metadata importers allow you to do.
Apple provides several core programming resources for Spotlight integration, and if you’re not sure where to begin, a fantastic starting point is the Spotlight Importer Programming Guide. Yes, it’s not the newest document out there, but the foundational principles still hold up. It’ll take you through the basics of how to structure a metadata importer, declare supported content types, and parse metadata in a way Spotlight can understand.
For more modern projects, especially if your app uses Core Data, Apple offers the Core Data Spotlight Integration Programming Guide, which discusses how to seamlessly surface Core Data objects directly within Spotlight. That means users can search for an object by name, notes field, or other attributes — and find it like they would any other file on their system.
To start building your own Spotlight extension, you’ll want to:
- Create a new metadata importer target in your Xcode project (File > New > Target > macOS > Spotlight Importer).
- Set up your Info.plist to define the file types your importer supports via
CFBundleDocumentTypes. - Write a custom
GetMetadataForFilefunction in either Objective-C or Swift. This is where you parse the file’s contents and add meaningful metadata to be indexed.
You’ll also work closely with certain frameworks like CoreServices and classes such as NSMetadataItem and NSMetadataQuery. These are your building blocks — giving you the power to analyze and retrieve metadata programmatically. The Apple Developer Documentation on Spotlight Foundation takes you deeper into this, with details on how these classes support your extension and allow you to test search behavior.
Testing and Debugging can make or break your user experience, so take your time. Use Terminal tools like mdimport -d3 to debug metadata extraction and mdls to inspect the resulting metadata from your importer. If you’ve ever been frustrated that something didn’t show up in Spotlight, imagine how empowering it feels to fix that directly in your app.
Sometimes, it’s the small details — like adding synonyms or keywords — that can meaningfully shape how well your content appears in searches, making your app feel delightful rather than distant. Thinking about how your users phrase things or what they might search for can guide what metadata you prioritize.
And remember, you don’t have to figure it all out overnight. The community of macOS developers is supportive, and many have shared tutorials, GitHub sample projects, and their own lessons learned. If something feels confusing or overly technical, give yourself grace. Learning how Spotlight works under the hood is like learning a new dialect of macOS — one that can make your app smarter, your users happier, and your development journey more fulfilling.
At the end of the day, creating or managing a Spotlight extension is about empowering users. It’s about respecting their time, giving them clarity, and ensuring that when they search — whether out of urgency or curiosity — they find exactly what they need. And that’s really where your work as a developer shines.