
Privacy is a major concern for many users when enabling Siri on macOS. While Apple emphasizes its commitment to user privacy, certain aspects of Siri’s functionality require data collection, which can make some people uneasy. Understanding how Siri processes and stores your information is key to making an informed decision about using it on your Mac.
When you enable Siri, Apple collects and processes various types of data from your device to help Siri function effectively. Among the information shared are your voice recordings, contact details, location information, and Siri usage data. While Apple states that this data is used to improve Siri’s understanding and functionality, some users may feel uncomfortable with personal information being sent to Apple’s servers.
Apple has implemented several measures to protect user privacy when using Siri. For example:
- Anonymization: Apple states that it does not link Siri interactions to your Apple ID. Instead, random identifiers are used to track data related to Siri requests.
- On-Device Processing: In newer versions of macOS, some Siri requests are processed directly on the device, without being sent to Apple’s servers.
- Deletion Options: Users have the ability to delete their Siri interaction history if they do not want this data stored.
- User Controls: Settings allow users to limit Siri’s access to certain types of data, such as preventing Siri from using location services or accessing contacts.
However, there is a catch—while some privacy controls are in place, enabling Siri on macOS still requires sending contact data to Apple. This has been a significant point of contention for those who prioritize digital privacy. Unlike other Apple features that allow for more control over data sharing, Siri’s reliance on contact access makes it difficult to fully enable it without some level of data transmission.
The reasoning behind sending contact data to Apple is to improve Siri’s ability to recognize and understand names when making calls, sending messages, or looking up people-related information. Despite Apple’s assurances that the data is not linked to personal identifiers, privacy-conscious users may still prefer to keep this information entirely local on their device.
For those who find this requirement problematic, there are ways to mitigate the data being shared while still enabling Siri. By taking extra steps before activating Siri, it is possible to minimize the amount of personal data that Apple receives. This will be covered in the following sections, where we’ll explore workarounds you can use to enable Siri without compromising your contacts’ privacy.
Although enabling Siri on macOS requires sending your contact data to Apple, there are steps you can take to prevent this from happening while still allowing Siri to function. By temporarily removing your contacts from macOS before enabling Siri and restoring them afterward, you can bypass this requirement and keep your information private. Here’s how to do it.
Step 1: Back Up Your Contacts
Before making any changes, it’s crucial to create a backup of your contacts. This will ensure that you can restore them later without losing any data.
- Using Contacts Archive:
- Open the Contacts app on your Mac.
- In the sidebar, select All Contacts.
- Go to File → Export → Contacts Archive…
- Choose a location to save the archive and click Save. This will create an .abbu backup file.
- Manually Backing Up the AddressBook Folder:
- Open Finder and navigate to
~/Library/Application Support/AddressBook. - Copy the entire AddressBook folder to a safe location (such as an external drive or cloud storage).
- Open Finder and navigate to
Step 2: Remove Your Contacts Data
Now that your contacts are safely backed up, you can remove them from macOS to prevent them from being sent to Apple when enabling Siri.
- Ensure the Contacts app is closed.
- If you use iCloud for contact syncing, go to System Settings → Apple ID → iCloud and toggle off the Contacts option. Choose the option to keep a copy on your Mac if prompted.
- Delete all contacts manually in the Contacts app: Select all contacts (Command + A) and press the Delete key.
- Alternatively, delete the AddressBook folder from
~/Library/Application Support/AddressBookand empty the Trash.
Step 3: Enable Siri
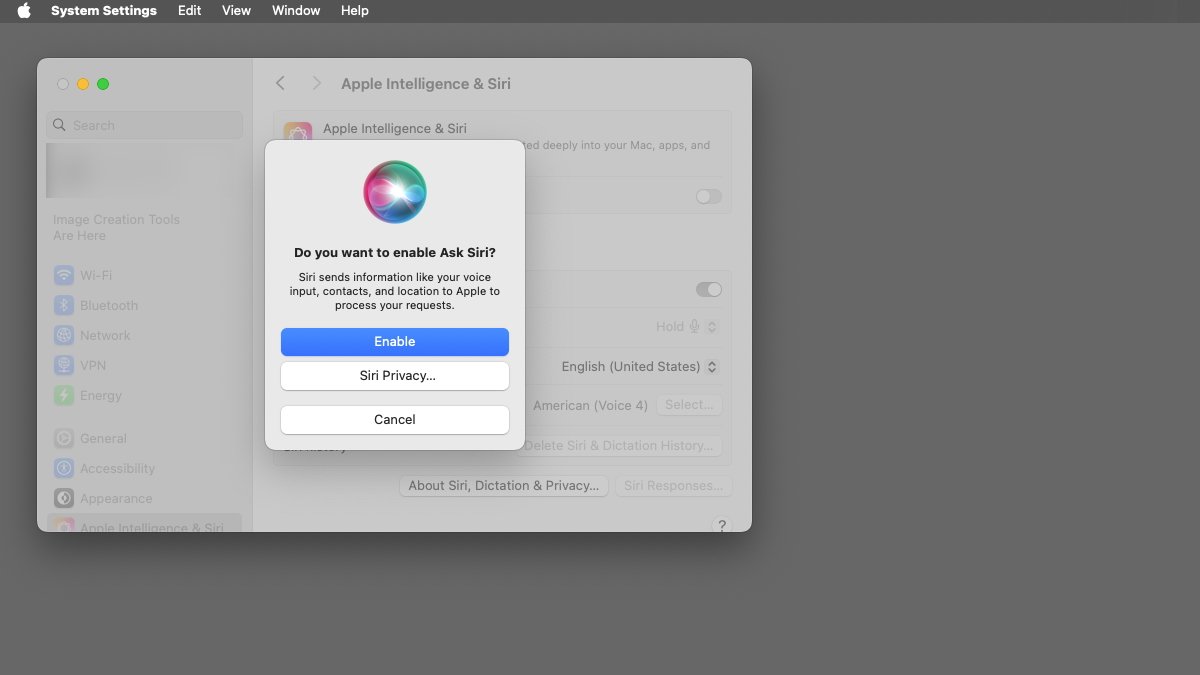
- Go to System Settings → Apple Intelligence & Siri.
- Toggle on Siri.
- When prompted with a warning that Siri will send your contacts, location, and voice data to Apple, click Enable.
- Now that Siri is enabled, your contacts were not shared because they were removed beforehand.
Step 4: Restore Your Contacts
After enabling Siri, you can now restore your contacts.
- If you used the Contacts Archive backup:
- Locate the previously saved .abbu file.
- Double-click the file to restore all your contacts.
- If you manually backed up the AddressBook folder:
- Go to
~/Library/Application Support/AddressBook. - Copy your original backup folder back to this location.
- Restart the Contacts app to verify that your contacts have been restored.
- Go to
By following these steps, you can successfully enable Siri on your Mac without sharing your contacts with Apple. Although this process requires a few extra steps, it ensures that your personal data remains private while still allowing you to utilize Siri’s functionality.
For those concerned about privacy but still wanting to use Siri on macOS, there are workarounds that allow you to keep your contact information private. While these steps may require a bit of effort, they provide a way to enable Siri without allowing Apple access to your personal data.
Option 1: Use a Separate macOS User Account
One of the simplest ways to keep your personal contacts away from Siri is to create a separate macOS user account dedicated to using Siri. This way, your main user account remains private while still allowing access to Siri when needed.
- Go to System Settings → Users & Groups and click the Add User button.
- Create a new user account with limited privileges.
- Log into the new user account and enable Siri as usual.
- Since this account does not contain any personal contacts, Apple will not have access to your data.
Whenever you need to use Siri, simply switch to this account. While this might not be the most convenient solution, it effectively separates your personal data from Apple’s data collection.
Option 2: Store Contacts on an External Device
Another approach is to move your contacts to an external drive or another secure device before enabling Siri. This ensures Apple does not receive any contact information during the setup process.
- Export your contacts as a .vcf file by opening the Contacts app, selecting File → Export → Export vCard…, and saving the file to external storage.
- Once saved, delete all contacts from your Mac by selecting all entries in Contacts, pressing Delete, and confirming the removal.
- Enable Siri in System Settings → Apple Intelligence & Siri.
- After Siri is enabled, you can import your contacts back to your Mac by opening the saved .vcf file.
This method provides a temporary way to keep your contacts private while still setting up Siri. However, if iCloud sync is enabled, consider pausing contact syncing during this process.
Option 3: Disable Contact Access for Siri
After enabling Siri, you can prevent it from accessing your contacts through macOS privacy settings.
- Open System Settings and navigate to Privacy & Security.
- Locate Contacts under the app permissions list.
- Ensure that Siri & Search does not have access to contacts.
While this does not stop your contacts from being sent to Apple during initial setup, it prevents Siri from accessing them afterward, reducing risks of further data usage.
These workarounds may not be ideal for all users, but they provide actionable methods for using Siri while maintaining your privacy. With Apple requiring contact access to enable Siri, taking extra precautions ensures you maintain control over your personal data.
Now that Siri is enabled on your Mac without sharing your contact information, the final step is restoring your contacts safely. Thankfully, since a backup was made earlier, returning your contacts to your device is straightforward. Follow these steps depending on the backup method you chose.
Restoring Contacts from an Archive (.abbu) Backup
If you exported your contacts using the Contacts Archive method, here’s how to restore them:
- Locate the .abbu file you saved earlier.
- Double-click the .abbu file. The Contacts app will open automatically.
- You will see a prompt asking if you want to replace all existing contacts—click Replace All.
- Allow a few moments for the restoration process to complete.
Restoring Contacts from the AddressBook Folder Backup
If you backed up the AddressBook folder manually, follow these steps:
- Open Finder and go to
~/Library/Application Support/AddressBook. - Ensure the Contacts app is completely closed.
- Delete any new files that may have been created in the AddressBook folder.
- Copy your previously backed-up AddressBook folder back into its original location.
- Restart your Mac or log out and log back in to apply changes properly.
- Reopen the Contacts app and verify that all of your contacts have been restored.
Restoring from an iCloud Backup
If you use iCloud to store your contacts, you can easily restore them by re-enabling contact syncing:
- Go to System Settings → Apple ID → iCloud.
- Toggle Contacts back on to re-enable syncing.
- Your iCloud contacts should reappear in the Contacts app within a few moments.
Final Verification
Once your contacts are restored, take a few moments to verify that everything has returned properly:
- Open the Contacts app and confirm that all entries are present.
- Ensure that important contact details (email addresses, phone numbers, notes) are intact.
- Perform a quick search in Contacts to check if all expected records appear.
By carefully following these restoration steps, you can enjoy Siri on macOS while keeping your personal data safeguarded. While Apple’s requirements for enabling Siri may be frustrating, taking proactive steps like these gives you more control over your privacy without losing essential functionality.