
Setting up Apple Mail on your Mac doesn’t have to be intimidating — even if technology isn’t exactly your best friend. Whether you’re preparing for a busy work week or simply want all of your emails in one easy-to-access spot, this process is designed to be simple, seamless, and stress-free.
If you’re brand new to Mail or just adding a new email account, something as small as a wrong setting might feel overwhelming. But don’t worry — we’re here to walk you through it together, one easy step at a time. Take a deep breath, and let’s begin.
You have two main ways to add an email account to Apple Mail on your Mac, and both are quick and user-friendly. Let’s start with using the Mail app itself:
- Click on the Mail icon in your Dock or launch it from your Applications folder.
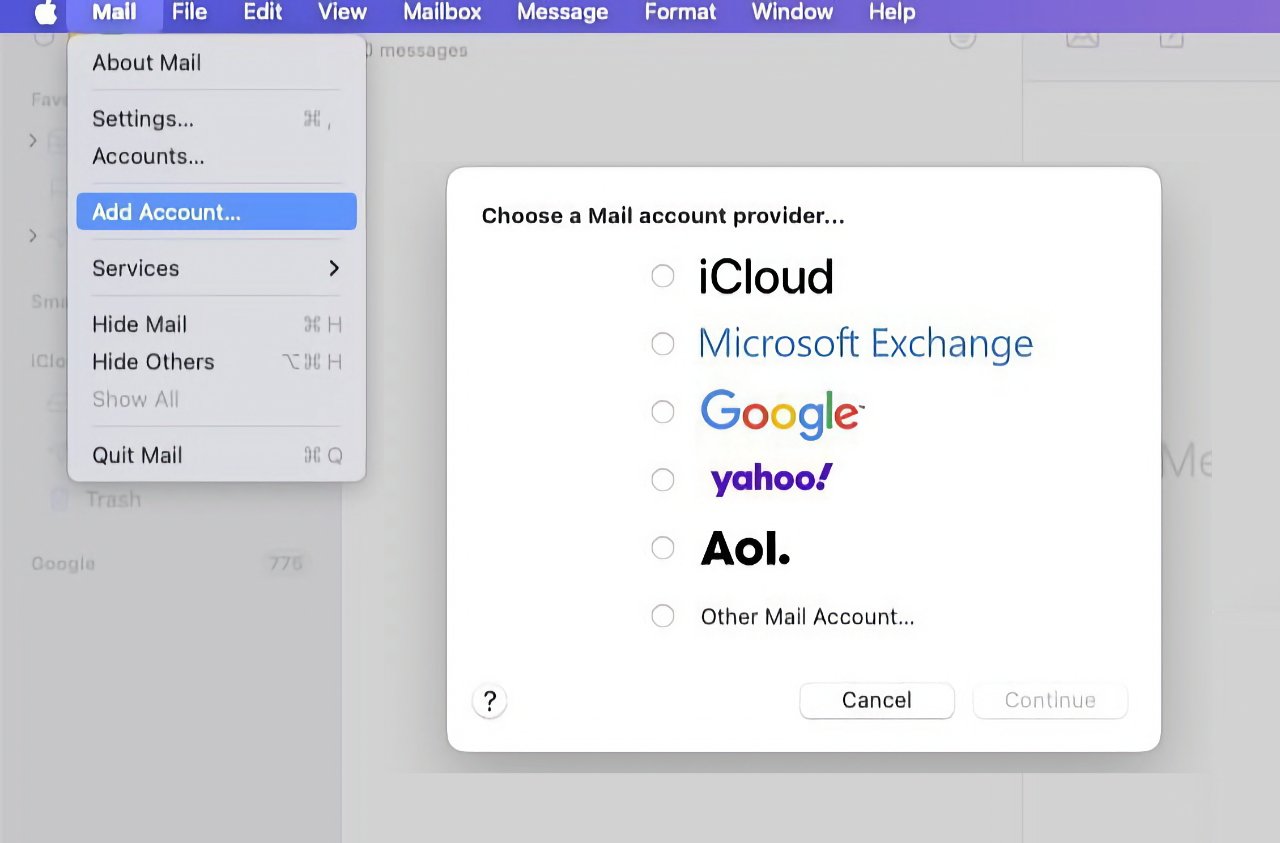
- From the top menu bar, click on Mail, then select Add Account.
- A window will pop up with a list of major email providers. If you see yours listed (such as iCloud, Google, Yahoo, or Outlook), just click it. Don’t see your provider? It’s okay — choose Other Mail Account.
- Fill in your full name, email address, and password, then click Sign In.
If your credentials are correct, macOS generally does the heavy lifting by pulling in the right server settings automatically. But in those cases where Apple Mail needs a little help, your provider’s website usually lists exactly what you need — think incoming/outgoing mail server names and port numbers.
Once everything looks right:
- Select what you’d like to sync with your Mac — just Mail, or maybe also Notes, Contacts or Calendars (depending on your provider).
- Click Done and voilà! Your mailbox is set up and ready to go.
Prefer going through your Mac’s System Settings? That’s totally valid too, especially if you like keeping everything managed in one place.
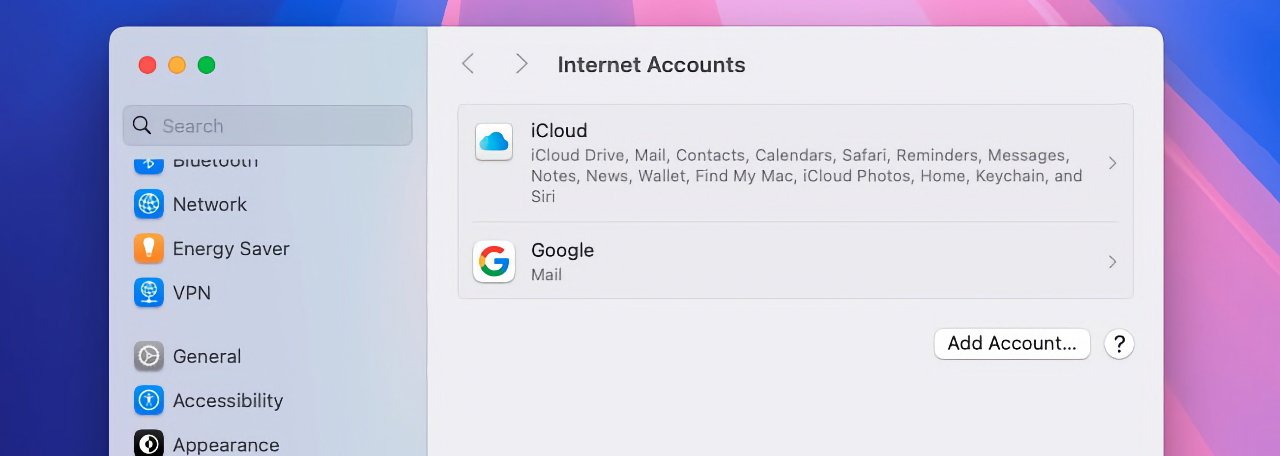
- Open the System Settings app (you’ll find it in your Dock or under the Apple menu).
- Click on Internet Accounts in the sidebar.
- Then select Add Account.
- Pick the service you want to connect — the rest plays out just like the Mail app method: enter details, choose what to sync, and finish setup.
Whichever way you choose, know this — you’re not alone if you feel unsure at any point during the process. It’s okay to take your time. The best part? Once your account is connected, everything begins to feel a lot more streamlined. You’ll see your emails appear neatly in your inbox — without hopping between browser tabs or separate apps.
By bringing your emails into Apple Mail, you’re not just setting up a mailbox — you’re claiming a bit more control and peace of mind in your digital world.
Moving over to your iPhone or iPad, the process of adding an email account to Apple Mail is thankfully just as user-friendly as on a Mac — and maybe even simpler. Whether you’re setting up your first email address or organizing multiple inboxes on the go, taking a few moments now can save you plenty of stress and screen time later. We get it — sometimes even the idea of fiddling with device settings can feel like a lot. But you’ve got this, and we’ll take it one tap at a time.
Let’s take a look at exactly how to set up your email account so you can stay connected, wherever you are.
- Start by launching the Settings app on your iPhone or iPad — that familiar gear-shaped icon usually near the top of your home screen.
- Scroll down and tap Mail — it might be grouped in with other Apple apps like Contacts or Calendar.
- Next, tap Accounts, which will show you any accounts already on your device.
- Tap Add Account. Don’t worry if things feel unfamiliar — each screen will guide you gently through the way.
- Select your email provider from the list (such as iCloud, Microsoft Exchange, Google, Yahoo!, AOL). If yours isn’t listed, just select Other. You’ll still be able to add your account manually.
At this point, you’ll be asked to enter a few key details — your name, email address, password, and an optional description (like “Work” or “Personal”) to help you stay organized. This step trips people up sometimes, especially the password part — so if you’ve recently changed yours or use multi-factor authentication, be sure to double-check you have the latest login info handy.
If everything checks out, your device will jump to another screen where you’ll have the choice to sync not just Mail, but things like Contacts, Calendars, Notes, and more — depending on what your email account supports. You’re in control here:
- If you only want email, simply toggle the others off and leave Mail turned on.
- If you’d like your calendars or notes to sync alongside your inbox, you can toggle those on too — it’s completely up to you.
Once you’re happy with your selection, tap Save, and just like that, your account will be added to the Mail app. You can now open the Mail icon from your home screen, switch between accounts, swipe through your unified inbox for all messages, or view each account separately.
It’s okay if things don’t look perfect immediately. Most issues resolve on their own in a few minutes as email sync begins in the background. And if something doesn’t look quite right — maybe a missing folder or an email that won’t send — don’t panic. These little hiccups are normal and usually easy to fix. You’ll be gently nudged to re-enter your password or correct a setting later if needed.
By setting up your email this way, you’re not just improving your workflow — you’re giving yourself the gift of convenience. Checking important messages on the go, keeping in touch with family, or catching that last-minute meeting request becomes that much easier when your inbox is right where you need it. No jumping between apps, no extra logins, just everything in one peaceful place.
So breathe easy knowing you’ve taken a meaningful step toward digital harmony — and your iPhone or iPad is officially ready to help you stay connected wherever life takes you.
Once your email account is added, you’ll notice that Apple Mail gives you a few options for what exactly gets synced to your device — and this can be a game-changer for how you use your email each day. It’s okay if you’re not sure which options you should select right away. That’s what we’re here for — to guide you through it and help you make the choices that best suit your lifestyle and the way you manage your digital communications.
After you enter your login credentials and connect your account, Apple Mail will prompt you with toggles for different services associated with that email provider. These often include:
- Mail – The core service, syncing your inbox, sent items, drafts, and folders.
- Contacts – Access and manage your address book alongside email correspondence.
- Calendars – Sync your events and meetings right into the macOS or iOS Calendar apps.
- Notes – If supported, keep your synced notes tied to the same email account.
- Reminders – Some services even broadcast reminders to your Apple devices through this connection.
Here’s where it becomes personal. Maybe you prefer to keep your professional contacts separate from personal ones, or you’d rather not sync calendar events to your device to avoid clutter. No judgment at all — everyone has their own flow. This is your opportunity to define how much or how little you want your email account to integrate with the rest of your Apple ecosystem.
Not sure what to choose? Here’s a simple guide to help:
| Want to keep things minimal? | Leave only Mail checked. You’ll get emails without pulling in anything else. |
| Manage your day from one device? | Consider enabling Calendars and Reminders to help you stay on top of important dates and to-dos. |
| Juggle contacts across jobs? | Toggle Contacts only on for accounts where contact syncing makes sense (e.g., work email). |
| Use apps like Notes across multiple devices? | Enabling Notes allows your ideas and lists to move seamlessly between devices. |
Remember, nothing is permanent. You can always return to the Settings app on your device or System Settings on your Mac and change what is synced. Just go to the account settings and toggle services on or off as your needs change. It’s fluid and flexible — just like your day-to-day life might be.
And if you’re someone who’s ever felt their device was doing “too much” or noticed excess clutter across their apps, simplifying which services sync can be an excellent first step toward reclaiming your digital peace. Fewer distractions, clearer organization, and a Mail app tailored just to your rhythm.
There’s no one-size-fits-all approach — just the right settings for you. So take a moment to think about your workflow, your privacy preferences, and how connected you want each account to be. Then tap, toggle, or click with confidence, knowing you’re shaping a smoother, more efficient email experience, one thoughtful setting at a time.
When setting up Apple Mail, it can be frustrating if things don’t go perfectly on the first try. If you’ve ever felt a knot in your stomach after seeing an error message or waiting endlessly for your inbox to sync, you’re definitely not alone. The good news? Most issues have straightforward fixes — and you’re just a few small tweaks away from a fully functioning email experience.
Let’s walk through some of the most common hiccups and how to troubleshoot them with clarity and calm. Whether you’re on a Mac, iPhone, or iPad, these tips will help you troubleshoot issues quickly and confidently.
1. Can’t Log Into Your Email Account?
- Double-check your password: This might sound obvious, but it’s the most common issue. If you’ve changed your password recently or have two-factor authentication enabled, make sure you’re using the most up-to-date and correct credentials.
- Visit your email provider website: Log in via a web browser to confirm your account is active and the credentials work. If not, reset your password there first.
2. Email Not Syncing or Missing Messages?
- Check your internet connection: A weak or interrupted Wi-Fi connection can prevent Apple Mail from syncing properly. Try toggling your Wi-Fi off and back on, or switching to cellular data.
- Refresh your inbox: On iOS, pull down within the Mail app to force a refresh. On Mac, select the Mailbox menu and click Synchronize All Accounts.
- Look at sync settings: Make sure syncing is enabled for Mail under account settings. If you previously toggled it off, your inbox won’t update.
3. Receiving But Not Sending Emails?
- Check outbound server settings: Especially with manual configurations or non-mainstream providers, double-check the SMTP server settings. These include server name, port number, and authentication requirements.
- Try deleting and re-adding your account: This quick reset can often resolve sending issues, especially if Mail has saved incorrect settings.
4. Apple Mail Keeps Asking for Your Password?
- Re-enter the password manually: Your iCloud Keychain might have stored an old password. Enter it again when prompted, and check “Remember this password in my keychain.”
- Remove and re-add the account: Sometimes a corrupted keychain entry keeps triggering the login prompt. Starting fresh can fix it.
- Update to the latest iOS/macOS version: Occasionally, software bugs related to Mail are patched in newer updates.
5. New Emails Taking Too Long to Arrive?
- Adjust fetch settings: On iOS, go to Settings > Mail > Accounts > Fetch New Data. Choose Push if available, or select a more frequent fetch interval like Every 15 minutes.
- Confirm background app refresh is on: Especially relevant for phones or tablets on battery-saving modes, if Mail isn’t refreshing in the background, you won’t see updates until opening the app.
6. Mail App Crashing or Not Responding?
- Restart your device: Restarting often clears temporary bugs and gives Mail a fresh start.
- Update to the latest version: Bug fixes from Apple can improve stability. Check under Settings > General > Software Update (on iOS) or System Settings > General > Software Update (on Mac).
- Test in Safe Mode (Mac only): Starting in Safe Mode can help diagnose conflicts with other apps. To do this, restart your Mac and hold down the Shift key as it boots up.
If all else fails and your email still isn’t behaving as it should, don’t hesitate to reach out to your email provider’s support team — they may need to check things like IMAP access permissions or app-specific passwords on their end. And remember, Apple Support is also just a chat or call away when you need a bit more assistance.
You don’t need to be a tech wizard to solve these issues. Empathy, a little patience, and a steady pace will take you far. Like any new tool or setup, there’s a learning curve — but you’re well on your way to mastering Apple Mail, with fewer distractions and more ease each day.